
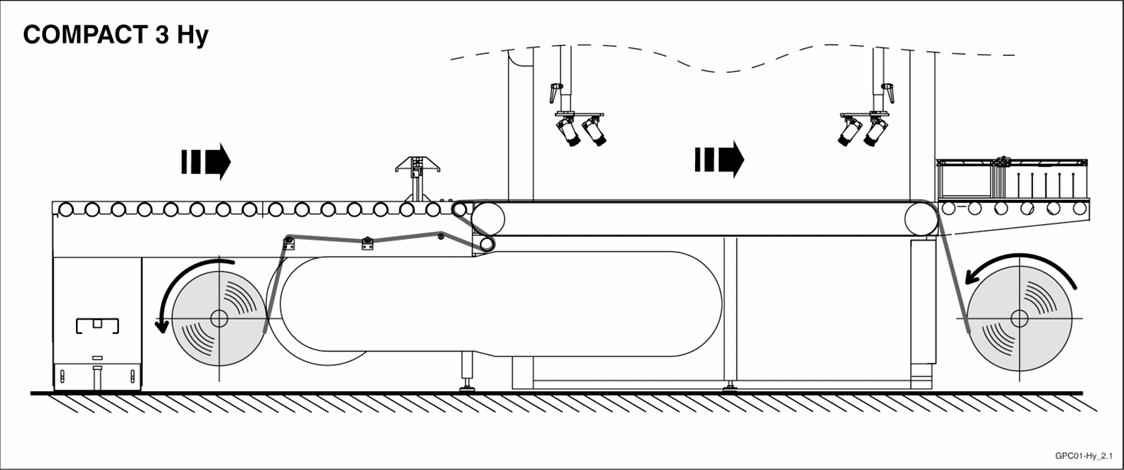
Image from manual showing proper routing of paper: Note this works for all Compact Models
Quick Guide
Preparation
Remove the side shields for easier access.
Locate and remove the paper break sensor bar (photo break bar).
Thread the Paper
Route the paper:
Above the first roller
Over support roller
Below the square metal bar
Under and around the roller below conveyor
Up, over and around the last infeed roller before the main conveyor roller
Onto the conveyor belt
Slightly loosen the infeed brake to allow easier feeding.
Add slack as needed.
Feed Paper Through Booth
Tape the paper to the belt to hold position.
Reconnect air to the back/take-up roll to prevent alarms.
Clear alarms and start Manual Mode.
Go to Conveyors and start the conveyor.
Stop the conveyor when the paper just starts to rotate around outfeed roller.
Remove tape from conveyor and pull towards the take-up roll.
Allow paper to feed under and around the take-up roll.
Plug air back in and allow the paper to wrap several rotations.
OPTIONAL: You can take the paper over the first or second outfeed rollers to help prevent overspray.
Reassembly
Reinstall the paper break sensor bar (must ride on top of the paper).
Reinstall side shields.
Key Notes
Always remove the photo break bar before threading.
Ensure air is connected before running conveyors.
Proper routing prevents tearing and repeat alarms.
Summary
This video explains how to re-thread paper on a Compact spray machine after a paper break when the paper has been pulled completely through the system. Following this procedure helps prevent tearing and repeated alarms.